Browse Plan Categories

Meet Upsie

Return navigate_next
Food Photography 101: How to Capture Great Food Pictures
September 16, 2020 *
People are doing more cooking this year than ever before. Sourdough bread was all the rage in the springtime and there is bound to be another food trend when people are once again stuck indoors this fall. If you’re on the cooking train, you may also want to photograph your food for Instagram, a blog or just to send to friends and family. We outlined some tips to help you capture the best food pictures.
Abide by photography basics
Photography 101 says to abide by these main principles when taking a photo:
Rule of thirds
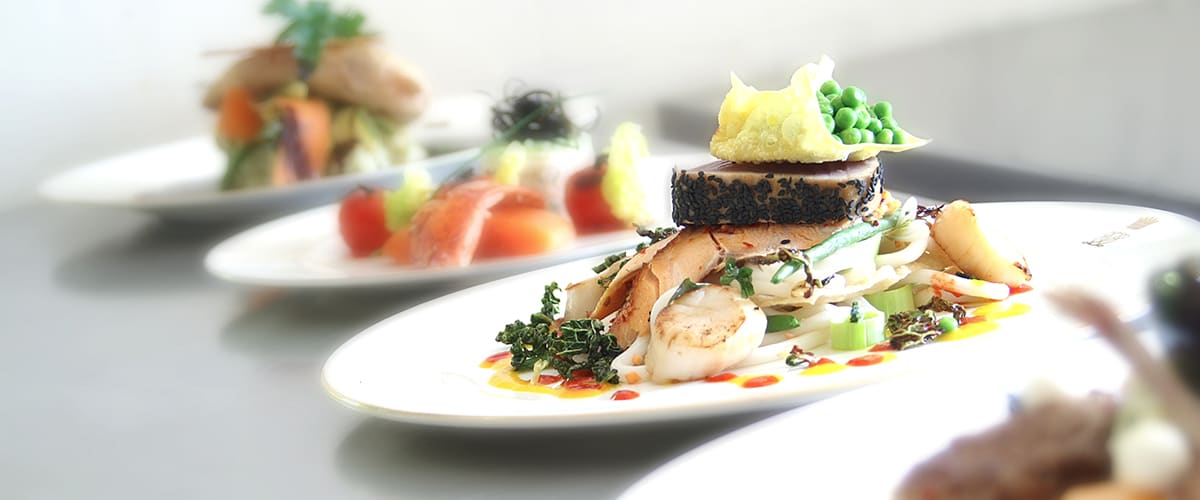
Abiding by the rule of thirds will make your food pictures more pleasing to the eye. Essentially, imagine that each photo has two vertical and two horizontal lines, making 9 even sections. Every line intersection, or the very center of the photo, is a more ideal place to put the subject of your photo. For example, in the photo below, the seared ahi, which draws the eye, is splitting the difference of the upper right third with the wonton.
Photography Exposure triangle
The exposure triangle can be a tricky concept to grasp. To better understand it, you must practice, practice and practice some more. ISO, aperture and shutter speed make up the photography exposure triangle. They all affect each other and should be used and adjusted together.
ISO
What is ISO? It technically comes from “International Standards Organization,” but that is a somewhat outdated meaning, as it was created before cameras were electronic. Now nothing changes mechanically in your camera when you adjust your ISO, but it still controls how sensitive your camera sensor is to light.
When it is very bright out, you will leave your ISO at the base, which is usually 100. Alternatively, when it gets dark out, or if you are in a room with low-light, you will increase your ISO to a higher number. Furthermore, when you increase your ISO significantly, it will introduce grain into your photos. Grain is usually undesirable, but some photographers add grain on purpose to get a more vintage style. To avoid getting grain in your food photography, check that your aperture is all the way open and your shutter speed is as low as possible without the image getting blurry before increasing your ISO too much.
Aperture
While ISO is how sensitive your camera sensor is to light, aperture controls how light passes through the lens diaphragm. You’ll also hear it being referred to as your f/stop. The main use of the aperture is to control your camera’s depth of field or how much of the image is in focus.
If the aperture is low, like around 2.8, less is in focus and the image is brighter. Think of this as your phone’s portrait mode. Alternately, if you increase your aperture, more will be in focus, but your image will get dark because less light is being passed through. In order to take a usable photo, you will have to increase your ISO, reduce your shutter speed or both. When photographing food, you will likely want to use a higher aperture so the entire plate or dish is in focus.
Shutter Speed
The last part of the exposure triangle is shutter speed. As it sounds, it determines how fast the shutter opens and closes. This does two things: it controls how much light is let in and it controls if you get a sharp or blurry image. When shooting handheld, you will never want to go lower than a 200-250 shutter speed because humans don’t hold perfectly still. If you go lower than that, you will likely move around enough that your image will be slightly blurry. Additionally, if it is bright out, you will need to increase your shutter speed to let less light in or risk ending up with a very overexposed (bright) image. Now, if the shutter speed is at 200 and your image is crisp but dark, check that your aperture is completely open at the lowest number before going negative. If the image is still dark, try increasing your shutter speed.
Leading lines
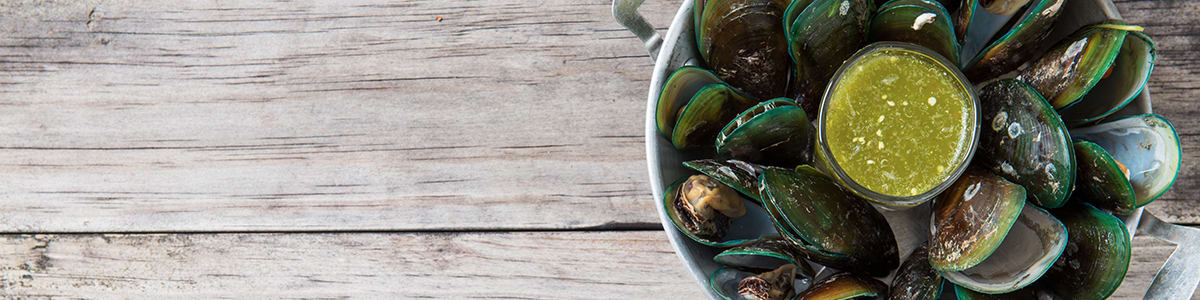
A common term in landscape photography, leading lines are applicable in all photography, including food photography. They are lines that naturally draw our eye to the intended subject. While there are no natural leading lines in food, there can be in how your photo is staged. Take the photo above, for example. The lines of the table draw your eye to the plate of mussels.
Protect your camera before bringing it in the kitchen
Did you purchase your camera or lens within the last 60-days? If you answered yes, we highly recommend protecting your expensive equipment with a warranty before bringing it into the kitchen. Sauces splash, floors get slippery and accidents happen. A camera warranty will protect it from accidental drops, spills and even mechanical failures. Check out Upsie’s camera and lens protection plans today. A small upfront fee could save you hundreds of dollars down the road.
How do I take beautiful pictures of food?
Photography is an art and a good chef is an artist. So we can only conclude that great food photography is a masterpiece! The cooking is up to you, but please use these tips to stage and take the best food pictures.

Leverage the photography tips (above)
Beautiful food pictures start with your ability to take a great photo. It may sound silly, but many people buy a nice camera and have no idea how to actually use it. Take the time to learn how to use your camera and set up a great shot leveraging the rule of thirds, the exposure triangle and leading lines before you hit the kitchen.
Bring in natural lighting
Lighting makes an enormous difference in the quality of your photos. You can have an amazing camera, a beautiful dish and end up with a sub-par food pictures if your lighting is bad. When possible, cook your dishes earlier in the day when it is still light outside. Natural lighting is often the most even, perfect light that you can get. Photographers love cloudy days when the bright sun isn’t casting harsh shadows around the picture.
However, using natural light is not always possible due to rain, very bright sunlight and even winter, when the sun sets too early. In this case, try replacing your kitchen and dining room light bulbs with LED daylight bulbs. The daylight color is a pure white rather than yellow like many regular bulbs. It will keep the color of your food more true and will be easier to edit. Additionally, if you need more lighting, invest in a simple ring light. They are adjustable, easy to move and store in your house. But, if you want to get more creative, there are more advanced options for you.
Select a backdrop
Like bad lighting, a poor backdrop can ruin the feel of your photo. A clean white background for a rustic sourdough boule doesn’t fit. Instead, use a natural wood table, a plaid towel or put it in a woven basket. On the other hand, if you make a beautiful, colorful cake, a white backdrop would be perfect to keep all attention on the cake. Or, photograph someone taking the cake out of a refrigerator to insinuate that your audience could be doing the same.
Upsie also offers great protection plans for refrigerators.
Plating food: make it look beautiful like a chef
There is a science to plating food. According to WebstaurantStore, there are five guidelines to plating food:
- Choose the perfect plate
- Place your ingredients like a clock. “From the diner’s point of view, your protein should be between 3 and 9, your starch or carbohydrate from 9 and 12, and your vegetable from 12 and 3.”
- Pay attention to details including color contrast, food height and texture.
- Design with sauces
- Use garnishes purposefully
Use props to invoke a desired feeling
Props are fun and don’t have to be expensive. Try picking a few flowers from your garden and place them in the background of a fresh vegetable dish to imply that it’s healthy. Or, in the fall, use decorative gourds and a few colorful leaves from a nearby tree for a nostalgic feel. The props that you use will help evoke a desired emotion from your audience and you can use that to your advantage to make the photo stick.
In addition, people love “behind the scenes” shots. Leave the skillet on the stove or range, spoon sticking out, to show where it was made. (Side note: Upsie protects stoves and ranges, too!) Just make sure to clean up any spills first! Or, have someone take a picture of you plating the dish (or take a picture of the cook plating it).
Whether you’re using a DSLR camera or pro mode on your smartphone, we know that you’ll have great results when you leverage these tips. And, don’t forget to protect your camera, smartphone and even appliances with Upsie.
Learn More About Camera Gear Warranties:


* This article is over 6 months old and may or may not be updated.